Friday 19 October 2012

Final Critique

FYI - my critique was attended by David Sheppard (NZIA president) and John Brown (Auckland City Council Built Heritage Implementation) plus my tutor this semester, Mark Cannata. Great feedback and discussion - the best critique experience I've had over the past 3 years.


The 3D print model


Tuesday 16 October 2012

Final plans

Levels -3 (green room, dressing rooms, storage etc) & -2 (main stage area & auditorium 'lobby')
Ground level


Levels 1 (studio/rehearsal space, admin) & 2 (restaurant & bar)

NB. did not include level 3 in my final poster as it just has the room for hire at the very top of the old fly tower and not much else (plus no room on the poster!)

Thursday 11 October 2012

To Do - Perspectives


  1. Overall external perspective, perhaps showing (a) retractable roof open and (b) closed.
  2. Auditorium images - audience perspective (down, up) and performer perspective
  3. Atrium image - will need to add planting in photoshop
Make new revit model with the same materials for everything, for rendering purposes.


Wednesday 10 October 2012

To Do - Context

Make sure the elevations show the other buildings clearly
Site plan - but make this a thumbnail, include the city blueprint plan as well
Theatre research text and examples of Globe plans & Bouffes du Nord


To Do - Physical Models

Concept

Present the teacup and Christchurch contour models

Site

Make laser cut external walls, put 'insert' inside. Would be more of a concept massing model.
Insert = different material, ideally a sphere to represent the auditorium geometry with a rectangle representing the atrium.

Section

3D print of a section, embed this in green flower arranging foam to highlight the depth of the building
Make STL file, print.


To Do - Diagrams

Include original diagram PLUS quick sketches of programme - see example from Jasmax lecture - for example different sketches in a sequence highlighting:

  • atrium
  • walkways
  • circulation
  • facade types (or material types)
  • entry (both)
  • roof (retractable open/closed)
  • auditorium void/geometry
  • vertical areas - atrium, auditorium


To Do - Sections

Shaded perspective 1:100 (or larger if fits)


  1. Section box in 3D view of Revit model
  2. Add shading
  3. Print
  4. Trace*
  5. Scan
  6. Photoshop*
    • make new areas quite distinct in colour and/or tone
    • make cut lines very thick/obvious
Detail perspective = atrium section 1:20
Could treat this in the same way as above


To do - Chair Detail

2D drawing of recycled auditorium chair
Find an existing detail somewhere...trace....OR balcony rail for leaning on (make this detail up)

Materials - leather, polished wood, painted metal
Smell & touch of old leather & wood

Leaving behind a trace of past use


Tuesday 9 October 2012

Detail drawings for structure

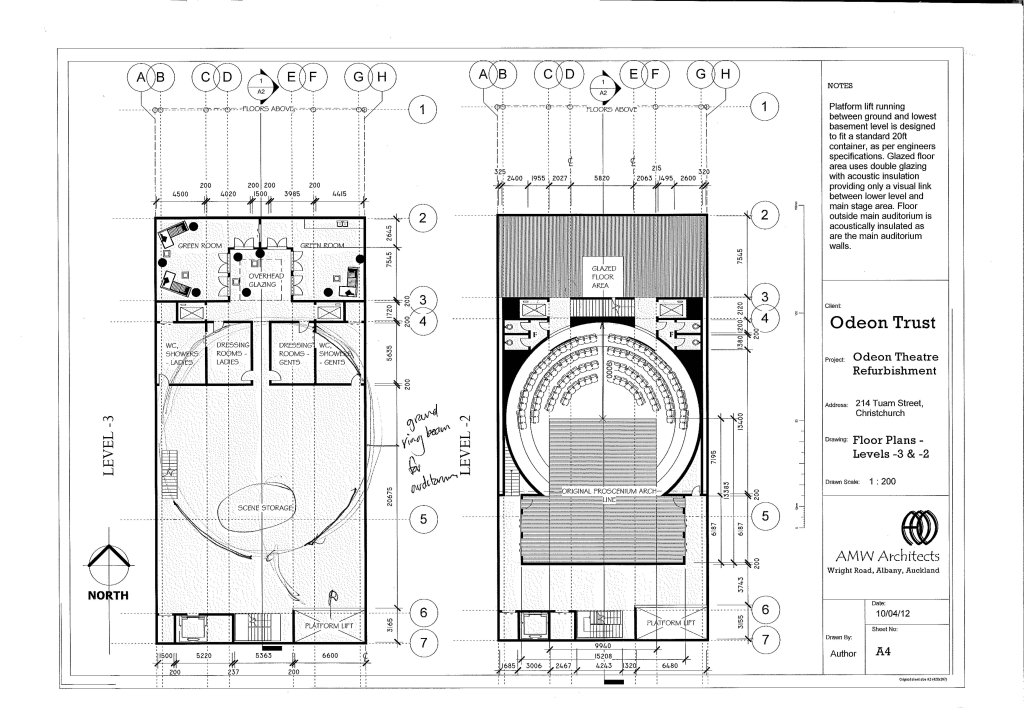
Auditorium strengthening - cage structure around the cylinder - this cylinder will now have to go all the way down to the basement level, with a perimeter footing 600x1000 as shown below.

 Have a separate drawing showing the different steel cage treatments for different areas (front block, atrium, auditorium, fly tower); the atrium will be quite different to the other sections in this respect.

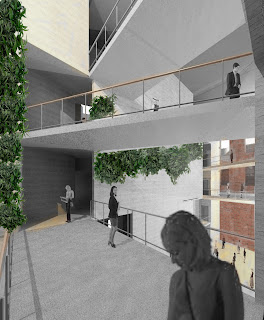
Walkway - steel beams (250mm) across the void with concrete topping (25mm), steel tray between.
Embed a short concrete beam within the cast concrete walls on either side to fix the walkway beams.


Saturday 6 October 2012

Strengthening unreinforced masonry walls..

Guidelines (draft): http://www.historic.org.nz/~/media/Corporate/Files/Submissions%20and%20research/DraftGuideEarthquakeStrengthening.ashx

Documents from retrofitsolutions.org:
http://www.retrofitsolutions.org.nz/wp-content/uploads/2011/03/Retrofit-Techniques-for-Seismic-Improvement-of-URM-Buildings.pdf

http://www.retrofitsolutions.org.nz/wp-content/uploads/2011/03/Out-of-plane-Strengthening-of-Unreinforced-Masonry-Walls-using-Near-Surface-Mounted-Fibre-Reinforced-Polymer-Strips.pdf

US FEMA standards - the most relevant guide is FEMA Techniques for the Seismic Rehabilitation of Existing Buildings, 547 (2006 Edition) is a comprehensive guide to earthquake strengthening in relation to the FEMA model building types. Each chapter provides a description of the model building type, the seismic response characteristics, common seismic deficiencies and applicable rehabilitation techniques. As an example, the following detailed techniques are outlined for Building Type URM: Unreinforced Masonry (URM) Bearing Walls:


  • Brace or remove URM parapets.
  • Add wall to diaphragm ties.
  • Add reinforced cores to URM walls.
  • Add concrete overlay to masonry wall.
  • Add fibre-reinforced polymer overlay to masonry wall.
  • Infill opening in a URM wall.
  • Add concrete or masonry shear wall (connected to a wood diaphragm).
  • Add steel moment frame (connected to a wood diaphragm)
  • Add or enhance cross walls.
  • Add supplemental vertical support for truss or girder.
  • Add veneer ties in a URM wall.
NB. these NZ Standards are also relevant: AS/NZS 1170 Structural Design Action, NZS 3101 Concrete Structures Standard, NZS 3402 Steel Bars for the Reinforcement of Concrete, NZS 4230 Design of Reinforced Concrete Masonry Structures